Do you want to learn how to become a lifestyle blogger?
Here’s the thing, you can make money in the lifestyle blogging niche, but there is more to just visualizing the profitability.
Blogging has grown amazingly over the years, and it has given thousands of people the opportunity to monetize their time online.
Most bloggers started their blogs as a fun web journal before realizing the possibility of making money doing what they love. Currently, more and more people are blogging to make money.
Many posts on the internet offer guides to start, grow and make money from a blog. But then, your needs are specific. You want to start a successful lifestyle blog, and desire a genuine article that will guide you from start to finish.
In this post, you will learn how to start a lifestyle blog and all you need to do to make it successful.
What Is A Lifestyle Blog?
A lifestyle blog is a website that showcases the personal lives, interests, and passions of its bloggers. These blogs typically focus on topics such as fashion, finance, beauty, food, travel, parenting, pets, etc.
Simply put; a lifestyle blog is an online space to write about your life and everything surrounding it. You create contents inspired by your personal interests, daily activities and thoughts.
You can write about one or more topics, but some bloggers focus on specific aspects of their lives, like – beauty, college life, family, personal health, cooking, fashion and much more.
The lifestyle blogging niche is so broad with several sub-niches you can decide to focus on and never run out of blog topic ideas.
Forget about entertainment and gossip, blogging in the lifestyle blogging niche is the real deal!
Do lifestyle blogs make money?
You may have wondered, “are lifestyle blogs profitable?”
Starting a lifestyle blog to make money largely depends on the individual blogger and the niche they are writing about. Generally speaking, a well-managed lifestyle blog can be profitable if you build it with valuable and SEO friendly contents.
Any scalable business is profitable, but you are the defining factor of your success as a lifestyle blogger. You decide if you want to put in the work that brings the profit. You can make money in the lifestyle blogging niche, but you must put in the effort and stay committed to your goal.
Before I made my first $50, my lifestyle blog was a simple online journal. I never thought it could make me a dime, but it did! The idea of making more made me realize the importance of growing the blog. But then, blogging is not a get rich quick scheme. You need to work hard, be patient, and stay consistent. Don’t expect to rake in millions after only a month of diligence.
Lifestyle blog examples to inspire you
Camillestyles
Camille Styles, is a lifestyle blogger that offers readers a fresh perspective on fashion and home decoration. Her blog features lifestyle tips, recipes, photos of her stylish home and more fun topics.
Wit & Delight
Wit & Delight is an online hub that covers a variety of lifestyle topics, including fashion, food and drinks, and parenting. Through the blog’s posts, readers can learn about themselves and improve their lifestyles.
The Every Girl
The Every Girl website is a comprehensive resource for millennial women. It provides information on careers, travel, relationships, and wellness. You can also find challenges, courses, and giveaways here.
What makes a profitable lifestyle blog?
These are a few key elements that make a successful lifestyle blog.
- First, the blog should have a strong and unique voice. The blog should be written in a way that is engaging and interesting to read, and should provide readers with valuable insights and information.
- The blog should have a focus; find a good lifestyle blogging niche. This could be anything from fashion and beauty to travel and lifestyle. By having a focus, the blog will be able to provide readers with more targeted and relevant information.
- Your blog pages should be well-designed and visually appealing. Aesthetics is important in the world of blogging, and a well-designed blog will help to make a lasting impression on readers.
- Update the blog regularly with new content. Readers will appreciate a blog that is regularly updated with fresh and relevant information.
Ready to learn how to start a profitable lifestyle blog?
Let’s hop right into the process.
How to start a lifestyle blog in 12 easy steps
Now that you have gotten a good reason to jump into starting a lifestyle blog, sit back and make some important decisions that will affect its growth. We will discuss every step you need to take.
Step 1: choose your blog niche
I always tell new bloggers to only write about topics they are interested in or can grow to love. I made a lot of mistakes in the past, and would not want anyone to take the same route.
It’s important that you blog about what you like because it makes everything fun and easy. Yes, your audience first, but you must enjoy what you do, else you may not be able to deliver helpful contents.
As someone who wants to know how to start a lifestyle blog, you must research thoroughly and find a good niche. Avoid jumping on any niche because you believe it will be more profitable than others. This could be disastrous for your blogging journey.
You are more likely to lose interest if you pick a niche you don’t understand. You should only choose a lifestyle blogging niche you know about or wish to learn.
Best Lifestyle blog niches
There are many lifestyle blog niches out there. Some popular niches include;
- Travel
- Food
- Fashion
- Beauty and makeup
- Fitness.
- Finance
- Parenting (Mom blog, dad blog)
- Minimalist living
- Do it yourself hacks
- Professional Development
- Personal Development / Self-improvement
Your skill or expertise might make a good sub-niche. So, look within yourself1
What are you good at?
Cooking (food blogger) or reading (book blogger)?
No matter what lifestyle blog niche you choose, there are a few things to keep in mind if you want to be successful.
- You need to be passionate about your niche. If you’re not passionate about what you’re writing about, it will be difficult to keep your blog going.
- Before you choose to know how to start a lifestyle blog, you need to be able to provide valuable content to your readers. This means that your intended blog must be informative, interesting, and helpful.
- If you can provide value to your readers, they will be more likely to come back to your blog again and again.
If you want to launch a successful lifestyle blog, it’s important to keep these points in mind: success requires time and effort, but it is definitely worth the effort.
Step 2: Choose a blog/domain name (URL)
After choosing your niche, the next thing you should work on is choosing your blog/domain name. This will be your website’s address (like mine, blogtrovert.com).
Choosing a good domain name is one of the most important steps in setting up a website. It’s the first thing people will see and it’s what they’ll associate with your site, so it’s important to choose something that is both easy to remember and relevant to your content.
When brainstorming for a blog name, you should have four things in mind;
- Choose a name that is simple and easy to spell
- Make it as short as possible. It will be easier for people to remember.
- Last, it should have a connection with what you intend blogging about. If you’re starting a lifestyle blog about pet care, for example, you might want to include words like “pet” or “care” in your domain name.
Creating the perfect blog name is important. It creates a memorable identity, builds credibility, speaks to readers and sets you apart. It’s intimidating, but here are 7 steps to inspire you:
- Pinpoint core topics. Think about what you’ll cover and focus on one or two.
- Brainstorm keywords. Generate words & phrases related to topics. List your favorites for titles & combinations for brandable domains.
- Use alliterations. Two or more words beginning with the same letter is attractive & easier to remember. For example, CatCase or KittyCase for cats.
- Play with synonyms. Find adjectives & verbs that match topics & voice. Add suffixes like “ly” or “ness” to refine.
- Consider figures of speech. Puns, rhymes & metaphors make interesting names. Eg. a limerick blog called The Limericks Archives (TLiA).
- Get creative with idioms & proverbs. Combine elements associated with emotions & identities. Eg. Living The Joy Jive, BraveBliss Blissitudes.
- Don’t limit yourself! Give sensible rules a chance. Great ideas have infinite potential.
Once you decide on your domain name, register it through a domain name registrar, then proceed to the next step. I currently recommend Namesilo and Cosmotown.
- Namesilo – $13.95/year
- Cosmotown – $9.49/year
Step 3: Choose a blogging platform
Blogging platforms provide a simple way to create and share your thoughts with the world.
There are many blogging platforms available today, each with its own set of features. It can be tough to decide which one is right for you, but I’ll make it easier for you to choose.
Here are a few things to consider when choosing a blogging platform:
- Ease of use: You want a platform that is easy to use and navigate, so that you can focus on writing your posts, not struggling with the mechanics of the site.
- Flexibility: Can you customize the look and feel of your blog to match your personality? Can you add features like social media buttons or a contact form?
- Cost: Some platforms are free, while others charge a monthly or annual fee. Consider your budget when making your choice.
- Audience: Who do you want to reach with your blog? Some platforms are better suited for certain audiences than others.
- Technical support: If you run into any problems with your blog, will there be someone there to help you?
Take some time to research the different blogging platforms available and decide which one is right for your lifestyle blogging career. With a little effort, you will find a platform that meets your needs and helps you connect with your audience.
What is the best blogging platform for a lifestyle blog?
If you have learned how to start a lifestyle blog, you will have come across different blogging platforms that include the following; These are all popular among bloggers.
- WordPress
- Wix
- Showit
- Squarespace
- Weebly
- Write.as
My recommendations?
“WordPress,” but you can use blogger.com if you are not yet financially capable to self-host your blog. Blogger is the best free option and allows you to monetize your website. See blogger.com vs WordPress.org.
This post will guide you through how to start a lifestyle blog on WordPress, as I strongly recommend it to anyone who wants to be in charge of their website, blog for long-term purposes and make more money.
Why I recommend WordPress
In 2017, I moved my blog from blogger.com to WordPress and the experience has been worth every penny spent.
I love the fact that my audience can communicate with me easily via my comment box without challenges (A funny reason!). Here are a few more reasons why I love and recommend WordPress:
- WordPress has tons of free and premium themes and plugins to make everything a lot easier for you, even if you are a total newbie.
- You can set up an eCommerce store in your blog with the help of WooCommerce. You will not have to pay an extra fee to get a functional store up and running.
- WordPress is a popular platform and there is a large community of users and developers who can help you if you run into any problems. There are also a ton of resources available, so you can learn everything you need to know about.
Note, the next few steps are important, but not a prerequisite for understanding how to start a lifestyle blog. If you would rather not stress with setting up your blog; hire a professional and skip to step 11, that’s where the blogging begins, but it’s a plus to know how to set up your website.
Step 4: Choose a hosting provider
If you want to manage your blog with WordPress, you will need a web host.
If you have registered your domain as recommended in step 2, you’ll need it to set up hosting for your lifestyle blog. If not, head over to Namesilo and buy your domain now. Namesilo offers one of the cheapest domain registrations on the internet.
I am currently an Interserver affiliate – I use and definitely recommend them because of their incredibly budget friendly prices and outstanding 24/7 customer support.
Get 99% off your first month on Interserver with this coupon code: BT1OFF.
Procedures for buying a hosting plan from Interserver
- First, navigate to interserver.com and click on “Buy Now” – you will be buying the Standard Web Hosting plan.
- It will take you to a new page instructing you to register a new domain name or use a domain you already own. If you purchased your domain name already, select “I already have a domain,” else select “register a new domain.” Interserver will register your domain name for the first year at $7.99 – renews at $12 yearly.
- Once you complete your domain selection, click on “Continue” and choose to not transfer your domain (except you want to).
- In the next page, create a new account with your correct details or login if you are an existing customer.
- Once you are logged in, you can review your cart, carefully taking note of how much you are paying now and for renewal. Use BT1OFF to get your first month at $0.1!
- Select a billing interval: 1 month, 6 months, 12 months, or 24 months. “Choosing a higher billing interval can give you an additional 5-20% discount.”
- Once you are satisfied with your order selections, choose a payment method: Credit Card or PayPal.
- Read and agree to the Interserver offer terms, then click on “Place Order.”
- Interserver will mail you all the important details about your new web hosting account and a link to log into your cPanel.
If you bought your domain name on Namesilo or any other domain registrar, change your domain nameservers to dns1.trouble-free.net and dns2.trouble-free.net. To change your nameservers, first, log into your Namesilo account and follow this video guide.
Enter your hosting control panel
Important Notice
You will receive a message containing your hosting details. The message entails:
- A link to your cPanel account.
- Your cPanel Username and Password.
- And more.
Please note the above. To be on the safer side, print the email or save it online securely. You may need this information in the future, as everything you need to access your control panel is in the message.
To begin, visit your cPanel account using the link provided in the hosting details sent to you and login with the username and password (they also sent this to you).
Now that you have logged in, you should be in your control panel. This is where all the technical matters will take place for your website. Please handle your login details with utmost care. Your cPanel will look like this:

Step 5: Set up SSL
It’s important that your blog goes live securely with a premium SSL certificate
A secured website is necessary for visitors’ and owner’s safety. Your site should run on HTTPS, so you definitely need an SSL certificate. Fortunately, Interserver offers a free SSL certificate for any domain you add to your Cpanel.
Follow the procedures below to activate HTTPS on your blog.
If you are yet to point your domain to Interserver, do so in your domain registrar.
Once you’ve logged into your Interserver cPanel, navigate to “Security” and click on “SSL/TLS STATUS.”
In the next page, you will see a list of domains without an SSL certificate. Simply select all unsecured domains and click on “Run AutoSSL.“
Interserver will process the request and assign an AutoSSL certificate to your domain. Make sure you point your domain to Interserver before you run this process, else it will fail.
If you follow the instructions above, you will have successfully activated HTTPs for your domain.
Step 6: Install WordPress
Now that you have bought and activated your hosting plan from Interserver and installed SSL in your domain. It is time to install WordPress. Interserver makes installing WordPress an easy task with the Softaculous apps installer.
In your cPanel, simply navigate to; “Softaculous App Installer” and select WordPress (you should see the large WordPress icon).
On the next page, click “Install now.” Softaculous will pull up the setup options to install WordPress. The guide below will help you set up your WordPress site properly.
Install WordPress with the procedures below:
- Choose Installation URL
- Make sure you use the HTTPs protocol; but your domain must have a SSL certificate. Don’t have a certificate yet? Go back to step 5 to install SSL in your domain.
- Choose Domain: Ensure you select the domain you want to install WordPress in.
- In Directory; kindly ignore the “In Directory Field” you obviously want WordPress installed on yoursite.com.
- Site Settings: Simply enter your desired site name and description. You can always change this in your WordPress dashboard. Leave the multi-site and WordPress cron boxes unchecked.
- Admin account: I’m sure you know what this means. By default, the admin username and password is “admin.” You should change this to a preferred username and a very strong password. Also, don’t forget to keep them safe. You need them to log into WordPress after installation.
- Set language to the language you want your blog in and leave other settings to their default setups.
- Input an email you want Softaculous to send your WordPress installation details, then click on “INSTALL.”
Softaculous will install WordPress in a few seconds and send you the necessary details you need to access your WordPress admin dashboard.
Okay! This wasn’t so bad! If you follow the steps above, you will have successfully installed WordPress on the Interserver standard web hosting plan.
Step 7: Design a logo for your blog
A logo is an important part of any blog. It’s a symbol that represents your brand and can help readers identify your lifestyle blog quickly and easily.
When designing a logo for your blog, there are a few things to keep in mind.
- Your logo should be simple and easy to remember.
- It should be relevant to the topic of your blog.
- It should be eye-catching and visually appealing.
With these things in mind, let’s take a look at a few tips for designing a great logo for your blog.
- Keep it simple: A complex logo will be hard for readers to remember and identify. Stick to a simple design that can be easily recognized.
- Make it relevant: Your logo should be relevant to the topic of your blog. If your blog is about food, for example, then a logo featuring a fork and knife would be appropriate.
- Make it eye-catching: A visually appealing logo will help attract readers to your blog. Use bright colors, interesting fonts, and other design elements to make your logo stand out.
- Make it unique: There are millions of blogs out there. Make sure your logo is unique so that readers can easily identify your blog.
- Use it consistently: Once you’ve designed your logo, be sure to use it consistently across all of your blog’s platforms. This will help readers easily recognize your brand no matter where they see it.
Where to find a good logo designer
You are looking to learn how to start a lifestyle blog and not become a designer.
Well, who said you had to be?
There are a few places to find good logo designers online. You can visit sites like 99designs or hire independent freelancers on Fiverr. Using the tips above, tell your designer your needs and let them do the job for you.
On budget? You can create a simple logo on Canva, but make sure it’s unique and beautiful!
Another option to find designers is to search for them on social media platforms like Twitter or LinkedIn. Or ask for recommendations from friends or other bloggers.
To set up your Logo on your WordPress blog, go to “Appearance » Customize » Site Identity“
You can alter your theme and logo if they do not meet your needs, but do not change your blog and domain name as it will affect your blog growth.
Step 8: Change your WordPress Theme
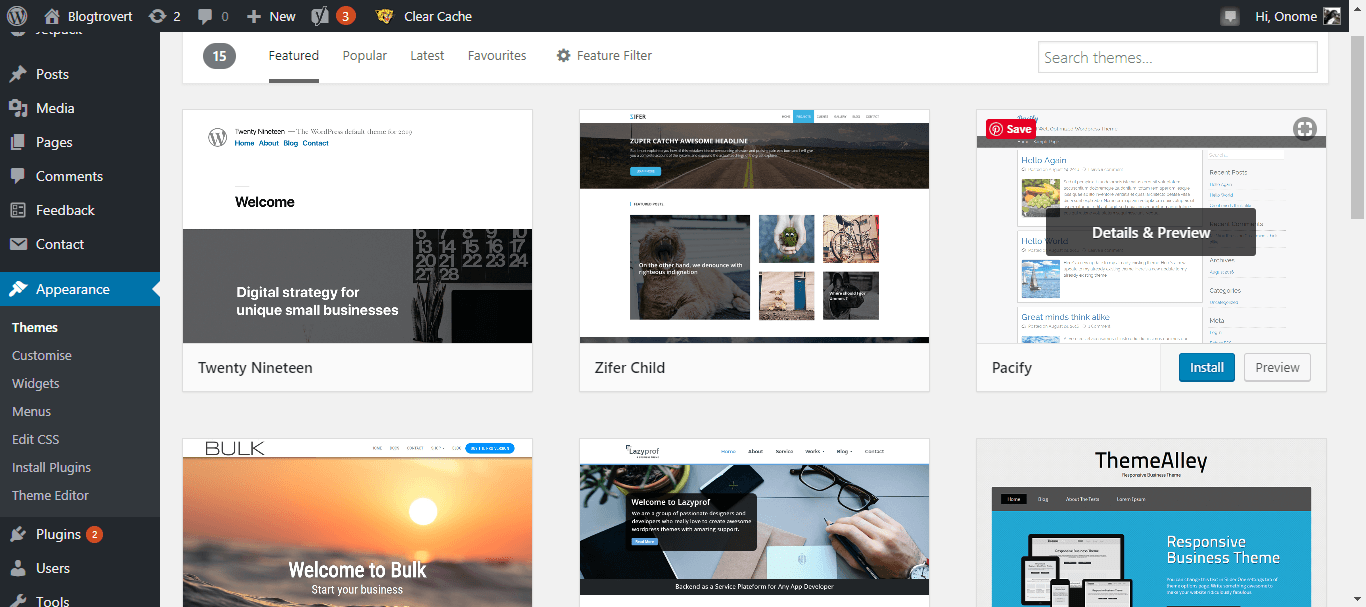
Now that you have installed WordPress in your domain, you can choose a theme to help your lifestyle blog stand out. This is optional but highly recommended.
To use a free WordPress theme, login to your WordPress admin dashboard and navigate to “Appearance >> Themes >> Add New.” You will find hundreds of free WordPress themes on this page.
Although WordPress gives you a selection of free themes to pick from, I strongly recommend that you start a lifestyle blog with a premium design. Premium themes often give you a sense of uniqueness and you can easily stand out from the crowd.
Why I recommend a premium theme
Premium WordPress themes offer a wide range of features and benefits that cannot be found in free themes.
Some of the advantages of using premium WordPress themes include;
- Access to more features that are not available in free themes.
- Regular updates
- Better support
- Increased security.
- More user-friendly
- They are designed professionally.
Check out ChicPixies for Simple and affordable Feminine WordPress themes
ChicPixies offers affordable, modern and stylish feminine WordPress themes for bloggers who just want to blog. ChicPixies has a theme that will suit your needs – sleek and minimalist design or a more colorful and festive look.
The ChicPixies website is easy to navigate. You can find the perfect theme for your website in a few clicks. Their themes are also very affordable, so you can get a great-looking website without spending a lot of money.
If you’re looking for a stylish and modern WordPress theme, then I highly recommend checking out ChicPixies. You won’t be disappointed! You can also browse through some of my favorite feminine WordPress themes.
Step 9: Install important plugins
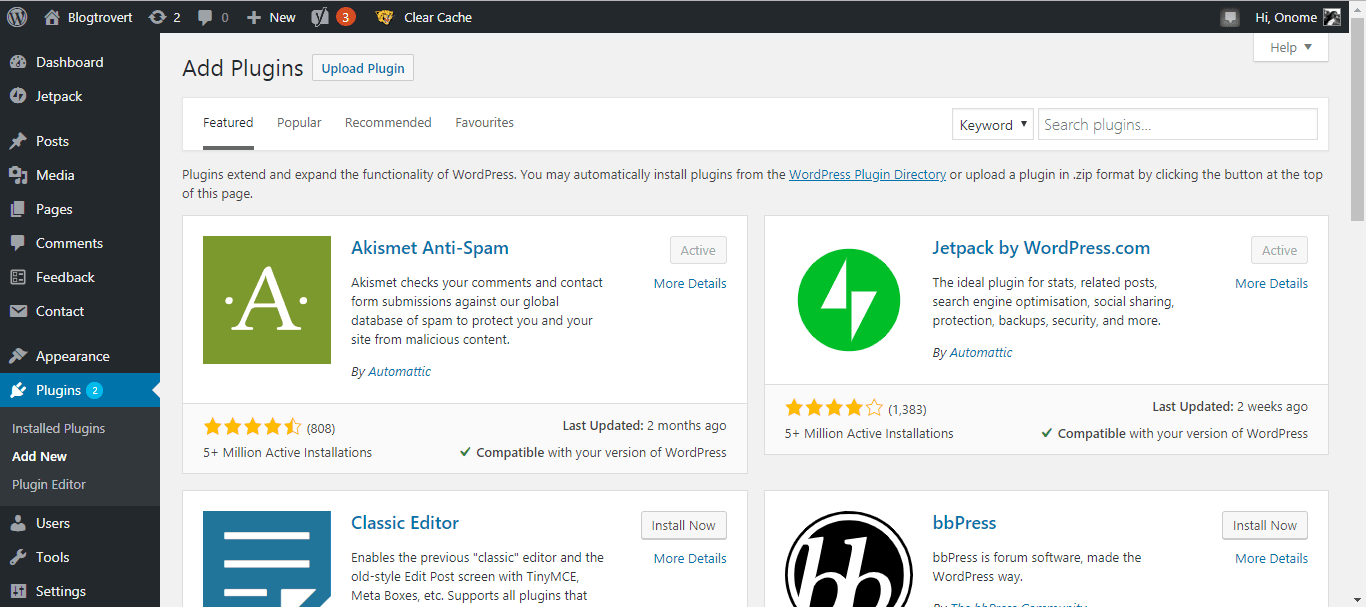
Plugins are important but not compulsory. They solve specific problems and provide essential functions. They help in the management and running of your blog. WordPress has tons of plugins to choose from. I will list a few that your WordPress blog needs.
- WP Security: This plugin helps protect your blog from hackers.
- Rankmath: This plugin is a must have as it helps you create SEO optimized posts.
- Akismet: This plugin blocks spam comments on your blog posts.
- Jetpack: A plugin that gives you real time statistics of visits on your blog.
To add a new plugin to your blog, simply navigate to “Plugins >> Add New”.
STEP 10: Create important pages
You need Pages as they hold important and required information about and for your blog. Here are some of the necessary pages you should create.
- About Page: Here, your audience expects you to talk about yourself and your blog.
- Contact Page: This page makes it easy for your readers to contact you. There are plugins to help you add a contact form to this page. I recommend contact Form 7 or Ninja Forms.
- Privacy Policy Page: On this page, your readers expect you to inform them about the data you collect on your website and how you and other third-parties may use them.
- Disclosure Page: Create this page if you want to monetize your blog with affiliate links.
To create a new page, go to “Pages” >> “Add New”. Check out the ‘Important Pages that Every WordPress Blog Should Have‘ by Wpbeginner.
Step 11: Publish your first post
At this stage, it’s safe to say that you have successfully learned how to start a lifestyle blog. Now, let’s hop into the production phase. I assume you want to publish your first blog post.
First, delete the default welcome post automatically posted by WordPress. Log into your WordPress admin panel, then go to “Posts” >> “All Posts” and delete the default post. After that, click on “Add New”, then you will see a blank PAGE to create your first post.
It is important to do proper keyword research before writing blog posts, as they help people find your content on search engines like Google and Bing. Without keywords, your posts may be invisible to search engines, and chances are no one will ever read them.
Some keyword research tools you can use:
- Semrush
- Ubbersuggest – budget friendly
- Keysearch – pay as you go option
How to find post ideas for your lifestyle blog
One of the hardest things about starting a new blog is coming up with post ideas. It can be difficult to think of topics that are both interesting and relevant to your niche audience.
However, there are a few methods you can use to come up with post ideas that are sure to capture the attention of your readers.
- One way to find post ideas is to look at what other successful bloggers in your niche are writing about. See what topics are popular and consider writing about them from your own unique perspective.
- You can also use online resources such as Google Trends to see what people are searching for online. This can give you some great ideas for blog posts that are relevant to what people are interested in.
- Another great way to find post ideas is to ask your readers what they want to read about. Use social media, email newsletters, or even surveys to find out what topics your audience is most interested in.
Once you know what they want to read, you can write blog posts that give them the information they are looking for. If you’re still struggling to come up with post ideas, check out these helpful blog topic generators or copy these 100 blog Post ideas for lifestyle Bloggers.
Step 12: Create your social profiles
If you intend to develop your blog in the best way, then you should have social profiles set up with your blog’s name.
Create a page for your blog on:
- TikTok and other popular social media platforms.
One reason to be active on social media is to promote your blog to active users, build trust, and a community of loyal readers.
Always make sure to share your blog posts with your followers and interact with them so that they will know you are human!
How to become a lifestyle blogger that makes money
Now that you know how to start a lifestyle blog, how do you become successful in this niche?
There is no one “right” way to become a lifestyle Blogger that makes money. But there are some key strategies you can follow to help improve your chances of success.
Write quality contents
When starting a lifestyle blog, make sure you have a strong focus on writing quality content that is interesting and engaging for your readers. Remember to choose a good niche, stay authentic and avoid plagiarism.
Be active on social media
Develop an active social media presence and connect with your readers frequently to keep them updated on what’s new on your blog and what new offers you are offering for FREE or for a discounted price.
Connect with other bloggers
Be sure to network with other bloggers in the niche and offer them guest posts or joint collaborations – this will help build relationships with potential advertisers who may be interested in working with you.
Be consistent
Be consistent with your blog content and strategies, and you should be on your way to owing a profitable lifestyle blog!
How to monetize a lifestyle blog
starting a lifestyle blog comes with the benefit of monetizing it. There are a lot of ways to monetize your lifestyle blog, but I will discuss just a few popular opportunities.
Sell products
Many bloggers sell their products or services on their blogs. You can either sell digital products like e-books, printables, or physical products like clothes, pieces of jewelry, etc.
65 printables idea to create and sell
If you plan on selling digital downloads and need resources that will help you create better products, you can check out websites that offer craft templates and commercial use files.
Free svg websites like Designbundles have tons of free to use commercial files you can use in your digital products. If you are starting a lifestyle blog, you can promote products that are closely related to what you write about.
Sponsored content
You get paid to write or publish already written blog posts for another company on your blog. This is my major source of income at the moment.
Ad networks
Google AdSense is one of the most popular advertising networks for small blogs. It allows you to monetize spaces on your blog. It’s easy to set up. All you need is approval to take part as a publisher.
If you are able to grow your traffic, you can also apply to monetize with any of the ad network below;
- Shemedia
- Ezoic
- Monomeric
- Mediavine
- Adthrive
- Adsense
Each of these platforms has certain requirements your blog must meet to monetize with them: so do your research.
Offer freelance services
Get paid to write for third-party websites or companies.
Start a coaching business
If you can teach, then you probably should start a class on a skill or topic you know about that many others do not.
Affiliate marketing
Affiliate marketing is an amazing way to start making money from lifestyle blogging.
To make money as an affiliate marketer, you are expected to refer potential buyers to websites and for each product or service sold; you earn a percentage.
Conclusion
Once you are able to move from starting a lifestyle blog to publishing your first post, don’t be scared to go full time into blogging.
As earlier mentioned, with consistency in play, you will be able to enjoy what you’ve always wanted; working at Home as your Own Boss with lifestyle blogging.
Blogging presents us with so many untapped opportunities. Much the same as any business, it takes the correct knowledge, dexterity and consistency to scale through.
Whatever you’ve heard, blogging is more than just a hobby; it can be a rewarding career, but it requires hard work and dedication.
I hope this blog post taught you how to become a lifestyle blogger. Good luck!